Tuesday, December 16, 2008

Renovation complete

The stair case looks great without the unnecessary wall in the way.

One of two bedrooms. Gotta love those 100 year heart pine floors.


Monday, December 15, 2008

Shop doors


i finally built these doors and finished winterizing the shop. I installed a little Jotul wood stove in the corner for a touch of the warmth, although today was 60F. One day i plan to actually make things in the shop and not just make the shop.

Saturday, May 10, 2008

Play With Me Robots


I made these two robots from Black Walnut. They have movable limbs and elastic ligaments. I'll have to put some extra time into their artificial intelligence as they cannot answer any questions yet. These are just like the robot from the LoopyDoll print on etsy.


Saturday, March 15, 2008

Loopy Dolls Blogged


Miriam rocked it by making a butterfly and a cute bunny loopy. She is using a Husqvarna Viking Designer 1 sewing/embroidery machine to stitch together these fun little guys. Miriam and I got a very nice nod from two sweet little blogs joeysdreamgarden.blogspot.com
and theweereview.com (thanks to both of you). We used a vector illustration of the Ben Bear face and digitized it into an embroidery design to effectively reproduce the faces without having to make each one individually.

Tuesday, February 19, 2008

new toys


Miriam and I are working on a new set of softies called Loopy Dolls. They have little looped hands and are super sweet. Ben Bear has made his cameo along with a shark and some sly ninjas. They are mostly made from upcycled wool and cotton.
You can check 'em out at our new Etsy store Loopydolls.etsy.com

Saturday, January 05, 2008

Design Lab with Polygal


I just installed the first sheets of polygal on the shop. Slowly it's getting closed in. I'm working on some designs for the doors. I think they'll be pocket doors. In the meantime I'll be over at the house renovation project.

Thursday, January 03, 2008

BuilderBeast frames a floor!


Today Mo took photos of me looking through the plans. We also framed the floor of the new bathroom in this old house. The carpenter's of the future came back safely from the past.

Sunday, August 05, 2007

design lab


i have completed the 2x6 stick framing on the workshop. I am working on the door hangers. The galvanized metal roof went on smoothly and rain water is draining as it is supposed to. I would like to put rain barrels on the back side for a little water catchment, but the doors and polygal glazing comes first.
The space has limited functionality, but i am making a few small projects come to life.

These are rapid prototypes made from blueboard insulation. They will most likely work as the armatures for slip casted porcelin/ceramic sculptures.

This is a prototype of a small doll house for children. it is made from birch plywood and measures 36"x12"x12". I've had some successful play testing with some local kids. it's a pleasure to see them climbing on it, playing in it, and engaging in imaginative play.

Friday, May 11, 2007

Work Shop...Design Lab


For the past 6 months or more I have worked on the simple design of my work shop. I kept simplifying and complicating the design. I knew i wanted to pour a cement slab after I dug out the sloped terrain.


I also knew i wanted to install a radiantly heated floor with PEX tubing.


I designed a very simple roof line using TJI engineered beams and a cool cantilevered floating corner. Here is the first wall going up. All of the verticals in the stud walls are reclaimed 2x6's. They were saved from the ceiling of an old house in town. I had enough to frame all entire wall system.

Monday, December 04, 2006

still here. designing

just wanted to let everyone who reads this occasionally i'm still here. I've been busy designing and building a deck for a client here in town.


Moriah and I built this one out of a pressure treated alternative. that means no copper and/or arsenic in the wood. They use borate to keep it from rotting. It's a great "green" option for new decks.

Sunday, November 05, 2006

walnut woman


I've just started another sculpture. This woman will be both carved and assembled. using this beautiful Black Walnut wood given to me by a friend i'll make an articulated female figure. I'm hoping to find some type of ball joint to stand in for actual joints. i'm not sure exactly how that problem will be solved, but if anyone has a suggestion i'd be happy to entertain it. i'm looking for hardwared that is both strong and positionable. for example, if i raise the arm i would like to stay in place, either by friction or by tightening. Below is a picture of her legs. I have the pelvis, feet, and right arm/shoulder ready for rough out.

Friday, October 13, 2006

Horse - 14 hours


This past week I had a great opportunity come up. I was commissioned a horse. 18"x18"x8" in Red Oak.
The catch was that the clients were leaving TODAY. So I decided to run outside and gather up the chainsaw and chisels.
That was Monday afternoon. Tuesday, Weds, Thursday. By the afternoon of Thurs it was done.

Wednesday, October 11, 2006

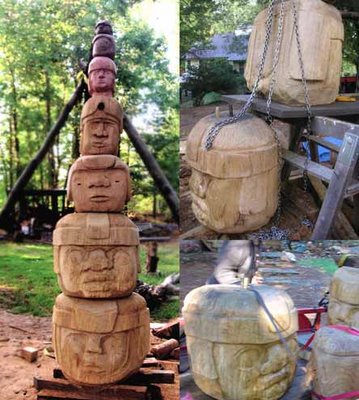
Totem - Day 46 +2


On Monday October 9, I installed the Totem Pole on 5th St in Charlottesville. I took one last shot of it before dismantling. That night I loaded it up into the trailer for the next morning and I was ready to go.
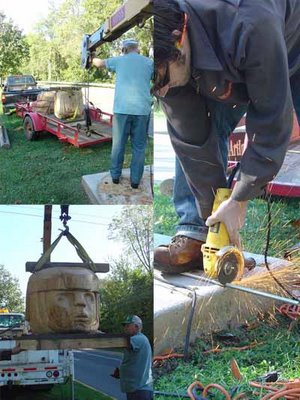
When I arrived at the site, Jake was there waiting. He's running the boom truck. Boy, that truck was nice to have. without it I would have needed 6 bulky guys and a yorkshire terrier to install it. The site needed a little prep before proceeding. I had to cut the bolts to size and drill holes in the concrete footer. Fit the first head and its base to those corresponding holes and set the bolts in epoxy.
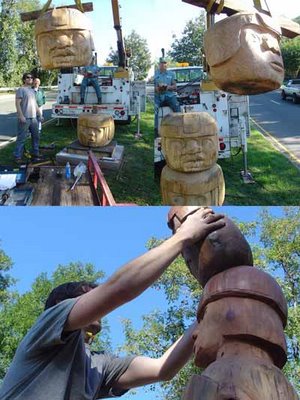
Ole' Jake hooked up the first head and whipped it over to the footer. "Not so high", I thought. Seeing the first couple of heads go up was exciting. In just an hour we had the whole sculpture in place and we were packing up the tools. It went as smooth as I could have hoped for.
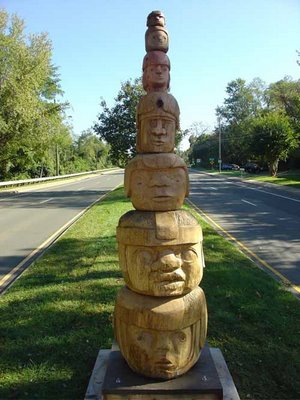
2 million cars drive 5th st every year. That's a lot more visibility than I've ever had before. Overall the project to 46 days. That's from the first cut to installation. The sculpture is 11' tall and weighs about 1800 lbs. The woods, from the bottom are: white oak, red oak, cherry, cedar, and black walnut. Next up is a little Red Oak horse commission and a Black Walnut figure that i've all ready started.

~ciao!
Jason

Wednesday, September 27, 2006

Totem - Day 35


We are getting to the nitty gritty, folks. I've made some special modification on the back side which i'll get a shot of next time. And i just realized that i haven't been photing the back up until now. Needless, i guess, because it was just the back of the heads. I've begun glopping her up with some sealant to deter rot, mold and uninvited insect squatters. The white oak, as my brother pointed out to me, will be the best defense against those three previosly mentioned visitors Although the Cedar would probably take the prize for top rot resister of the group. Anyway it's trivial, because i'm gloppin' it up. I hope the UV rays don't burn it right off.


In order to reach all those hard to reach places I have to dismantle the entire sculpture again. (200th time) In this picture I have the second head suspended above the bottom head so that i can reach the under carriage. The rest of the seven heads are laying on the ground waiting for a second coating.
I'll need to construct a base to fasten the sculpture onto the cement footer Art in Place is providing. I'll do that using a presure treated wood alternative from a local Green Building supplier in town called Nature Neutral They have some great supplies, check 'em out. The next photo is the spot where i'll install the sculpture and it will stay for the next year unless purchased. See how close it is to the road! yikes.

Saturday, September 23, 2006

totem - Day 31


The past few days I have been sitting and watching the carving. I'm just trying to take it in for all its worth. I'm sharpening my chisels and gauges doing a bit of refinement here and there. Mostly though the process has brought me to a point where there will be a just a few more touches. The faces are, i believe, in a good state between character/anime, like a biker gang and ancient warriors stacked up in memorial.

One thought has been to carve a single face in back of the third head. It is both the only piece of wood that has enough girth to accomodate a rear looking face and it is the middle of the sculpture. I think it will pose balance for the viewer as they fly past the sculpture. It is to be placed in the median on 5th st extnd. speed limit 45mph. a bit too quick for my taste, but what can i do. next year.

Monday, September 18, 2006

totem - Day 26


Nearly a month after i started and i am finis.... hold on..i just had a great day of carving. Yesterday i was able to get three heads started and nearly finished. today after some juggling, i fit those heads, pegged them together with oak dowels and began refining them.The top head (the 7th) is a spitting image of the second head, just in miniature. Yes, its seven heads now.
As Harris likes to say, "that's a nice pile of heads you got there."


The most challenging part of the process right now is fitting and pegging the heads together so they are secure and stable. Each head has to be levelled on the top and bottom and then the hole must be bored straight and square to the surface. Doing that is a bit tricky. But the top four heads are fit and secure and now i must address the bottom three monsters. the bottom head weighs in close to 600 lbs.

Thursday, September 14, 2006

totem - Day 22


Looks like rain and clouds again today, so there might not be too much progress.
But i did stack all the heads i have so far.

Wednesday, September 13, 2006

totem - Day 21


So far so good. I've refined all the heads that under way. I'm considering the 5th and possibly a 6th head. It'll have a russian doll effect maybe. i'm running ideas through my head. I also have to consider the location where it will be placed. Right now it looks like 5th street in the median. To me, it seems a fast to view the sculpture and not enough frontal viewing. The heads having faces require a 270 degree view from the front. But that is jsut the opinion of the sculptor.


I've decided to put in some slightly futuristic elements on the sculpture. This head (pictured above) has goggles pushed up on his helmet. and the bottom head has a microphone attached to his helmet. they are slight details, but necessary to position the sculpture in both the past with the Olmec and the future with technologica.
The last few days have been great but the rain and slightly drizzly weather has kept me from working any long hours out there. Mostly i've just had the sander and the chisels out.

Wednesday, September 06, 2006

Totem - Day 13


Today it rained, the sun came out, it rained. Each time I put the tools away and brought them back out I thought that would be it for the day. Anyway i managed to get a good amount of time in.
I thought I might describe some of the tools I use daily. I have this 4 1/2" Dewault angle grinder with Lancelot blades and disks. These disks allow me to carve out the contours of the form quickly and smoothly. I also use a Poulan 220 with 16" bar for little straight cutting and shaping and a Stihl 440 with a 20" bar for the big cutting.


Generally the process goes from big tools to little ones, but i'm always dancing between the range of saws, grinders, chisels, and gouges. I love my set of Marples chisels. They stay sharp a long time and perform many tasks. My drill is a Bosch 18 volt cordless. I used it today along with a 17" ship auger bit to bore the holes for the steel connector pins. What a strong drill! It hasn't failed me yet.

Monday, September 04, 2006

Totem - Day 11


Day 11 and I have 4 heads fit. After a couple days of Tropical Storm Ernesto rain and winds, I'll get back out there today. My deadline is in October and I have a ways to before I install the sculpture.